115 lines
5.2 KiB
Markdown
115 lines
5.2 KiB
Markdown
---
|
|
label: NGINX
|
|
order: 997
|
|
icon: /static/nginx.png
|
|
---
|
|
|
|
# NGINX Setup
|
|
|
|
### What is Nginx?
|
|
|
|
It's a free and open source software, it's really powerful but here we will only use it to display files on a simple web interface.
|
|
The files we are using will be media such as movies or animes, that you need to download yourself (here we will use torrents)
|
|
|
|
I will also refer to nginx as `HTTP access` in this tutorial because it allows the user to access his file using http.
|
|
|
|
**You must have a server (like a raspberry pi, a NAS or a seedbox) and a media collection to use this feature !**
|
|
|
|
___
|
|
### Why did I create that?
|
|
|
|
I used to be a user of [jellyfin](https://jellyfin.org/) because I didn't want to pay for a subscription and I didn't want to use proprietary software just to display files like plex.
|
|
It wasn't working really well and I sometimes wasn't able to play Movies and it semmed to use a lot of ressources
|
|
The solution? Scrape the media files and their metadata using Cloudstream-3
|
|
|
|
The advantages of this provier over jellyfin are that it's lightweight and integrated with cloudstream
|
|
|
|
___
|
|
**To setup nginx you must have a media server:**
|
|
- A 'managed' seedbox: is a service that you can rent and will take care of finding, downloading torrents and seeding them for you, check out mine [here](https://www.sarlays.com/my-media-server/), easiest method (that I use)
|
|
- You can also self host the media server, I cover the install of nginx [here](https://www.sarlays.com/unlisted/self-host-nginx) (harder)
|
|
|
|
Here I'll cover the install on a managed seedbox using ultra.cc
|
|
|
|

|
|
|
|
___
|
|
### What are trackers?
|
|
|
|
They are basically websites where you create an account and they "list" content hosted by other users registered on the website (they don't host the content themself).
|
|
Sonarr and radarr will then ask prowlarr to search for something specific like a movie or an anime inside this list built by the tracker
|
|
|
|
Once the movie is found, the torrent file is sent to transmission.
|
|
Transmission is basically a torrent downloader, it will download the files given by radarr and sonarr
|
|
|
|
___
|
|
### Installation with ultraseedbox
|
|
|
|
Ultraseedbox (now called ultra.cc) is a service that allows you to download torrents with really fast download speed and then seed those torrent (which means sharing it with other users how want to download them 24/7) but it cost some money, you can check them out [here](https://ultra.cc/) (I am not affiliated with them in any way, but their support and service is really great for me).
|
|
|
|
You can use any similar seedbox service that offers http access through nginx.
|
|
|
|
For my setup you have to install:
|
|
|
|
**required (for metadata):**
|
|
- Sonarr (for tv shows)
|
|
- Radarr (for movies)
|
|
- Nginx - http access (already installed by default on ultra.cc)
|
|
|
|
___
|
|
### Setting up radarr / sonarr
|
|
You must use a metadata downloader (that downloads `.nfo` files), I'll use radarr and sonarr since it's the easiest for me (it might be possible to download metadata using something else but I didn't try)
|
|
|
|
To install radarr and sonarr go into your control pannel, under installers search for sonarr and radarr
|
|
|
|
You now have to enable the download of metadata
|
|
|
|
To do so for Radarr go inside radarr to:
|
|
|
|
`settings > metadata`
|
|
|
|
you have to enable Kodi (XMBC) / Emby metadata
|
|
|
|
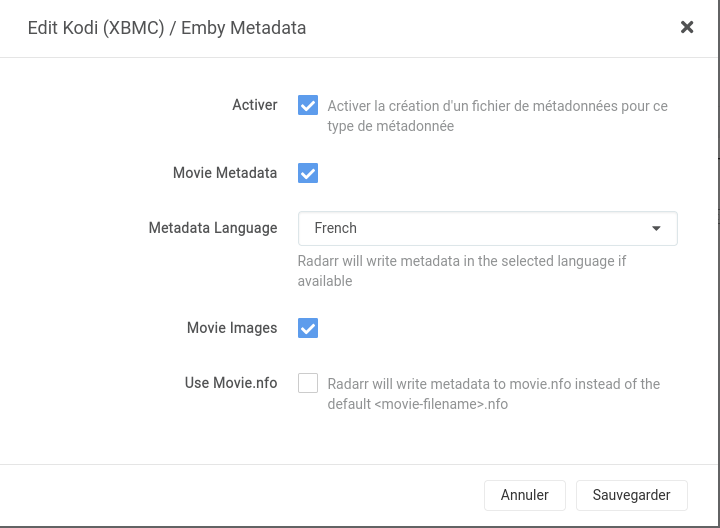
I use the following settings in radarr
|
|
|
|
|
|
|
|
you must untick "use Movie.nfo" as shown in the screenshot
|
|
|
|
For Sonarr go to:
|
|
|
|
`settings > metadata`
|
|
|
|
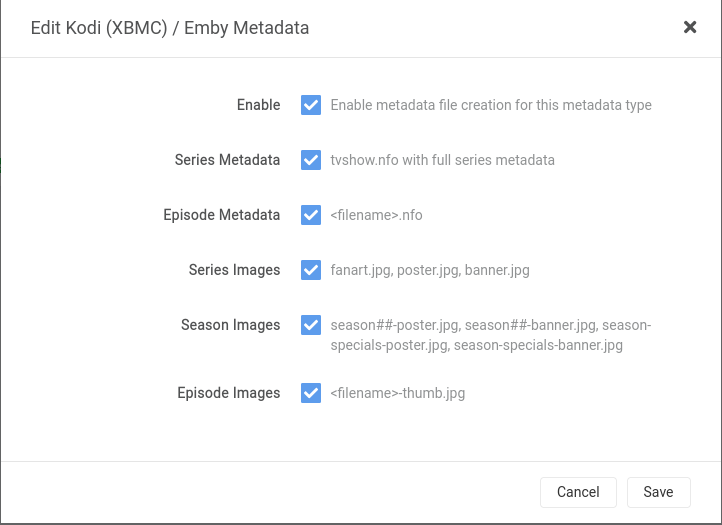
And enable those settings
|
|
|
|
|
|
|
|
If the metadata is not present, the movie / tv show will not be displayed by cloudstream
|
|
|
|
Now we are ready, if you want to add folders to the http access you can follow the documentation coming from [ultra.cc](https://docs.usbx.me/books/http-access/page/downloading-files-from-your-ultracc-slot-using-http-access)
|
|
|
|
___
|
|
### In cloudstream
|
|
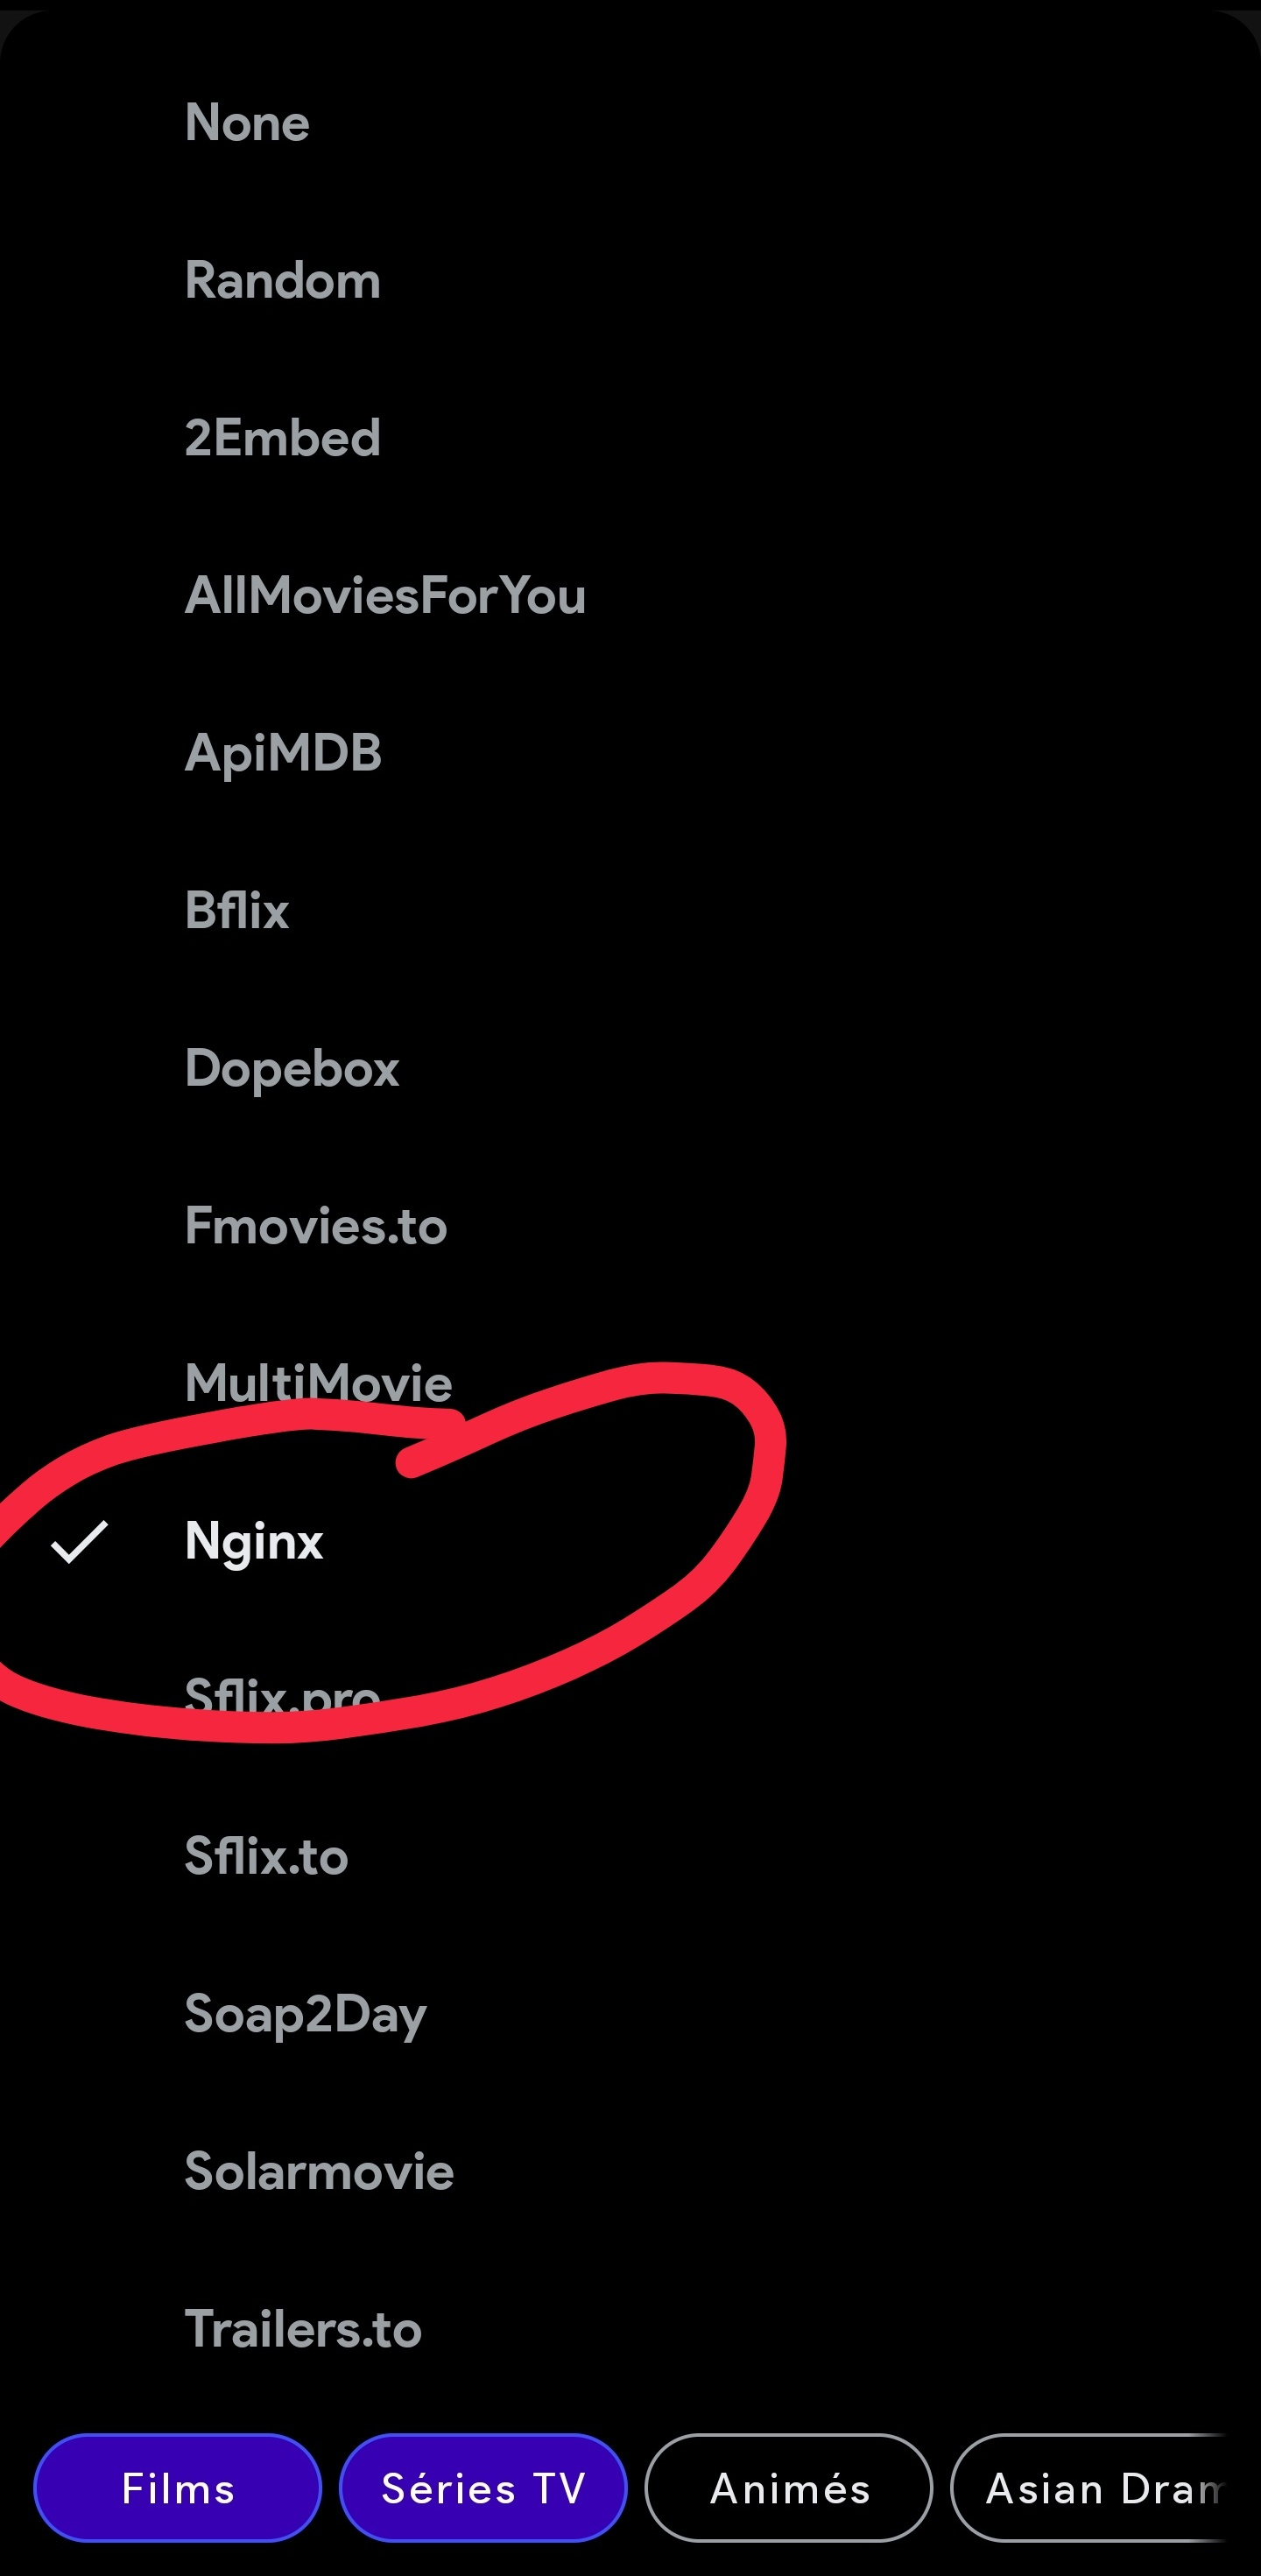
Go into the settings of Cloudstream-3 and click the Nginx server url button
|
|
|
|
Here you need to type the exact url of the http nginx server where you access your files, for exemple https://myusername.myles.usbx.me/
|
|
|
|
The http access requires authentification, you have to go under Nginx Credentials and type your username and password.
|
|
|
|
Those credentials are written in the control pannel of ultra.cc under:
|
|
|
|
`Access details > HTTP proxy access`
|
|
|
|
As written in the description, you have to supply those credentials using a very specific format,
|
|
let's say your username is `mycoolusername` and your password is `password1234` (Please use a password manager lol), then you have to type in the input: `mycoolusername:password1234`
|
|
|
|
|
|
|
|
|
|
You now have to restart the app to apply the changes.
|
|
|
|
Nginx will now show up in the sources list on the home page
|
|
|
|
It might say that no url is supplied when starting the application, you can just hit the retry button and it should work fine
|
|
|
|
That's it, you added nginx to Cloudstream |